
Tipi Raising
- Kimi BrownKawa

- Oct 30, 2019
- 7 min read
This post is for those who are curious about how we set up a modern tipi for winter living in the high desert...
On October 12, we drove in to pick up our tipi skin (if something can't be sent to our local PO box 6 miles away, we get it at our rented UPS address 40 minutes away in Gallup). On October 22, we laid out the skin to spray it with UV protection to guard it from the high desert sun. We had wanted a tan tipi to blend in more with our surroundings, but were counseled by the good folks at Nomadics that the white fabric holds up much better with high UV. We could get the white tipi and pay to have it stained (and of course we could spring for the incredible art they offer on their tipis), but we figured we'd just go with the white. We were trying to keep the cost lower than the repo shed option! The mitt is for wiping drips after spraying.


On October 23 we took delivery of the tipi poles. This was our first time having a freight delivery (or any delivery) out to our land, and we weren't sure how far the Old Dominon truck would be able to come in. We were hoping he'd make it to our campsite, but were prepared with our trailer just in case. The 12-foot trailer is too small to carry the 27-foot poles, but we figured we could make it work... The trucker did come in through our main gate, off of the highway, and continued on the first mile or so of well-maintained, straight road. He hesitated to take on our smaller, more curvy, rougher road, so we needed to move the poles into the trailer for the last half. In the last pics of the slideshow below, you can see our mesa in the background, to see how far we had left to go.


I headed off directly to pick up wood stain in Gallup while Chip drove the poles back and unloaded. When I came back he told me the strops holding the door abraded and broke a little over half way home, and the poles crashed to the ground! He had to reload the whole thing to get them that last half mile. Luckily they are very hefty and flexible poles, and none snapped.

As eager as we were to get the poles stained, we had to wait a few more days because of freezing weather. Once we got a 24-hour window, we stained the poles on October 26. The next day the winds were howling! Ribbons blew out horizontally, little dunes formed in our dusty sand, and a v-cloud blasted off of our mesa top.


We were determined to get the poles up, and braved the wind. It was a lot harder than it looked in the Nomadics instruction guide (which showed a much smaller tipi and, therefore, much lighter poles -- not to mention younger pole-lifters). Unfortunately we didn't have a photographer when our hands were full.
The low point for me was when Chip was tiptoe on the very top of the stepladder pushing up on the pole tripod, and I was pulling the rope to haul the tripod upright. That is a stomach-churning setup for me at best. I think Chip takes too many risks, partly due to his 100% confidence and that tendency to laugh off any perception of danger. So when even he called out, "I'm not OK!" I paid attention in spite of my sudden chill. I had taken too much weight off, so he was losing his balance. So I lowered the poles back down on him, which was counter-intuitive, to say the least. That was the diciest, but not the only, cumbersome and dangerous situation during the pole placement.
Once the tripod is up, you lay the other poles into the gaps in a specific order, which makes a lovely pattern. Our poles were thicker than spec, so the last couple poles threatened to slip out and crash down on the unsuspecting. It was a relief to me when we got the rope cranked around that top joint. That was a fun part too, cracking and snapping the thick sisal rope into place. It grips without tying, and the end can just dangle down into the tipi. Eventually the poles were set, and were still smiling (or maybe I should say smiling again...)!


We did not try to raise the skin in that wind. But here's what greeted us outside the popup door the next morning, on tipi-skinning day! (October 28, which incidentally would have been my late mom's 92nd birthday. She would have been completely stressed reading this post so far! That's where I get my nail-biting nature.)
We did go ahead and skin the tipi, as the snow sublimated and melted. You start with the skin wrapped to the final pole. You place that (heavy!) pole at the back of the tipi, and then shake and pull the skin around each side as if wrapping a cape around a giant's shoulders. Then you peg the front together (easier said than done, but not terrible). You stake the bottom edge out a few inches off the ground for drafting, and adjust the poles for a taut fit. Then you wearily smile for the camera.


It still had a few wrinkles, which we attributed to the thicker poles. We thought it looked pretty good, though!
Now it was time to set up the tipi interior. Unfortunately I don't have a wide-angle lens, so I can't get the great perspective of Nomadic's photos! Hopefully the following will be understandable.
The top row of pics shows the floor. We "bathtubbed" the sides to keep any water from coming into the tipi interior. We are on a slight slope, so this was most critical on the western edge. The outer skin is outside of the poles, and the floor is attached to the inside of the poles.


The second row of photos shows the tipi liner. We got the 6-foot liner. A 9-foot liner is also available, and we sort of wished we had opted for that. Since the liner overlaps the floor and is installed at the pole angle, the 6-foot liner really tops out at 5 feet, if that. First you attach three horizontal ropes around the poles. then you tie the liner ribbons to those ropes. The photo on the right also shows our first attempt at hanging a ceiling-like tarp to hold more of the heat down in the living height of the tipi. Nomadics sells an ozan for that purpose, covering about half of the area (you leave the rest open for the fire smoke to draft out).
Our cheapskate decisions on the tipi liner and ozan were based on the idea that this is the only year we are using the tipi for winter refuge, and we are trying to make long-term purchases; we don't have much budget for short-term purchases only for this year's comfort.
The pics below are shot up toward the smoke hole. the last one shows our propane patio heater, which Jeff and Sue gifted us (thank you!!) -- it is great for getting us through this winter, and will eventually be great on our some-day patio!


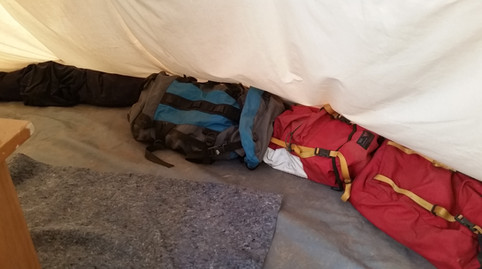
The idea of tipi air management is that air comes under the tipi skin and flows up to the smoke hole, drawing the smoke out. In cold weather the liner should separate the draft from the living space. Around the bottom of the interior you want to block any drafts coming in between the liner and the floor. You can buy "sand snakes" for this purpose (just like the snakes you'd use to block door drafts in conventional homes). We instead moved some of our storage in to store at the edges of the tipi where it's too low to walk anyway, and where the drafts needed blocking. Yes, those are the panniers from my 1985 bike trip across Australia -- have I mentioned we have a problem getting rid of things?


Below: Our $80 Home Depot clay chiminea before and after adding rocks for thermal mass. We figure we will heat the tipi using wood with a propane backup, or propane with a wood backup, depending on your perspective! The pic on the right is our new-and-improved-yet-very-ugly liner extender / ozan forming a wall and ceiling over the back half of the tipi interior. Yes, that's Chip's Wisconsin winter car cover from before he traded the Wisconsin car for a New Mexico truck -- have I mentioned we have a problem getting rid of things?


Below are a couple more interior shots. Toward the door showing the front dowel pins, bottom of the smoke hole and smoke flaps (partially hidden by the ozan in foreground), and blanket hung inside the door to provide a bit of a cold-air gap (hiding the door). Then panning to the right to the chiminea and wood tools, then from front to back toward our futon couch and scrabble table. We had one friend, Todd, in to see it -- his wry comment was "oh, so I see you didn't get the interior package shown on the Nomadics website" LOL! Yes we are not interior designers at this point in our living!


Our door (below) is a remnant from one of Chip's earlier tipis. And that last pic is probably heretical to the Nomadics folks -- we air blocked the tipi skin. You are supposed to leave the outer skin open to the ground for proper draft. Our crazy winds, though, pushed the dusty cocoa-powder sand up between the liner and skin, above the 6-foot liner, and into the living space, quickly depositing a quarter-inch layer of dirt on our floor in spite of the air-blocked liner! So we blocked about half of the openings, on the west (upwind) side. The tipi still drafts beautifully, pulling smoke out of the smoke hole. If we ever have any problems with draft, we'll open it up again, since our wind isn't always that fierce.


After a few rains, most of the wrinkles have worked themselves out, and we are pretty pleased. We've spent many evenings in the tipi playing scrabble and roasting pie-iron sandwiches, and have slept there once... I am not shocked that Chip's enthusiastic descriptions of toasty warm winter tipi nights were a little overly optimistic, since Chip is a very optimistic guy. We're continuing to work on optimizing things (we'll be extending the liner at the front of the tipi, adding a bit of a better airlock at the door, adding thermal mass, improvising a Japanese kotatsu, and we picked up another comforter from the storage unit) and we'll be sleeping out there again soon. Even without that, though, it's great having a cozy "living room" to stretch out in the evenings, and we do anticipate years of 4-season tipi use!


Thanks, Andy!
You two continue to amaze as you learn on the fly. Enjoyed reading your last posts. Hoping you have a great Thanksgiving and look forward to reading more about your adventures as you settle in.
Thanks, Maggie! Yeah, we have been shivering for YOU as we keep hearing about the crazy Madison winter. I took Madison off my weather.com list early on, but Chip keeps paying attention... and of course our sons are there. Crazy snow and cold!
We are very lucky here, since even on our single-digit nights, the worst daytime weather is in the 30s and blowing (more chilly than frigid), and the best daytime weather can still be up in the high 60s!
As for climate change, we're banking on NM getting wetter! Hah. Time will tell. We keep from going crazy about it by taking the "act locally" maxim to a micro level. Head in the sand, maybe -- but …
Congratulations on raising your tipi! Pretty damn exciting, and looks perfect in its place. I'm shivering for you, because it was 1 degree here Tuesday morning [so I may actually be shivering for me, more than for you ]. I'm not sure how cold it was in your neck of the, uh, mesa, but 1 is the loneliest number, just as the old song proclaimed. It sounds like you have alternative backup plans for not freezing to death, thankfully! We have already had over 12 inches of snow, which leaves me wondering how many winters and springs we will actually experience before the end of 2019, in our current totally messed up climate. Idiot Voss actually said that climate chang…