
The Closers
- Kimi BrownKawa

- Sep 4, 2022
- 5 min read
Last September after months of earth plaster angst, we encased the exterior of the first floor of our tire bale house in shotcrete. We were aiming to get the shell closed so we could start working inside, whatever the weather. Heading into fall, we still had holes instead of windows and doors downstairs, and those gigantic open triangles upstairs.
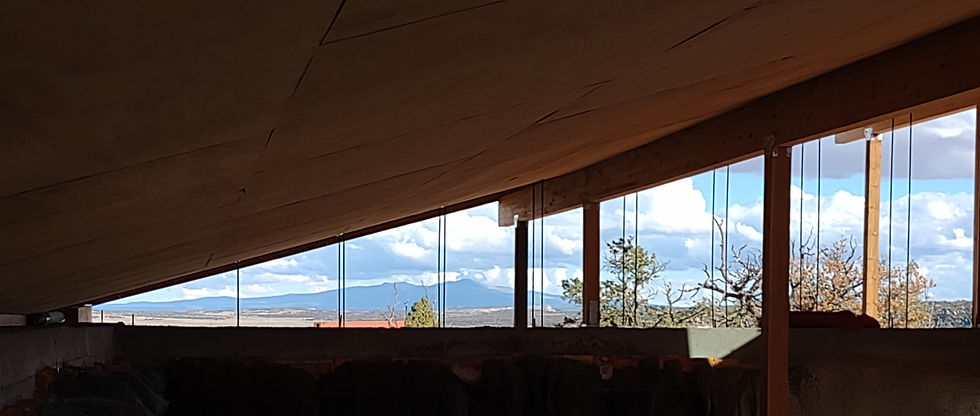
Yes, we were tempted to put in a huge triangle of glass to preserve that Mt. Taylor view!! But neither budget nor passive solar principles would let us go there.
So we decided instead to push ahead into the next daunting-because-we-have-never-done-anything-like-that-and-didn't-know-where to start task: our earthbag upper story walls to marry the concrete bond beam to the angled roof. Earthbag construction is usually done from the ground up, and the roof is supported by the bags. We had considered building an earthbag house which we learned about from our favorite building site, Natural Building Blog (by Kelly Hart and the late Owen Geiger) before we settled on tire bales instead. We thought the technique would be a good way to infill that triangular space. The bags are 14" thick, and we decided to fill them with scoria (lava rock) so that they would provide insulation. Sounded like a good fit for our solid, thick-walled, tire bale house.
Kelly Hart generously and patiently answered some questions in helping us figure out how to get the bags in place, since the normal technique is to lay out each row and pound it from above to compress and solidify the material. In our case, we would be squeezing against the roof at the end of each row and wouldn't be able to pound from above very well.
We ended up placing rebar inside and outside of where the wall would be, so we would build the wall between the rebar. Chip drilled into the concrete and used steel mending plates at the bottom and also attached onto the ceiling -- the rebar inserted through perforations in the mending plates, to help keep it from slipping. We planned designs for the walls, to be made with glass bottle "windows." We've seen these used to great effect in Earthships, but those walls are much thinner (concrete) and require cutting bottles to make "bricks." We had no idea if light would even travel through our 14" deep, bottle-narrow windows. To make bricks long enough we had to pair whole bottles, which we connected using metal flashing. I laid out designs with Chip's input -- we settled on a spiral for Chip's maybe-future loft and a snake for mine, and a sunrise for our bedroom. Then I made bottles and Chip framed out a door from the west maybe-future loft onto a little maybe-future balcony on the buttress. I sure hope we build that loft and balcony, or we will have an odd little 2nd story door up in the wall for no apparent reason!


OK, enough procrastination, with the planning and prep done, it was time to start filling those bags! We put up a scaffold and started hauling scoria from the front yard using 5 gallon buckets which we hauled with a garden cart. This was an awkward job. The scoria has a lot of bite which makes it hard to shovel and hard to flow into the mesh tubing. We tried using a bottomless bucket as a funnel, tried just dumping it in by the yogurt container, and eventually sort of settled on using a cardboard form for concrete posts to get the scoria into the bags. At the narrow roof end of each row we compressed the rocks toward the back wall to get it pressed into the corner as much as possible. Then we worked out from there, using fists and boards and whatever we could fit in to compress it down as best we could. When we got to the higher ceiling parts we could compress from above like you would normally do building an earthbag wall. We did our best to remember to get the bottles in where they belonged, and worked to get them to squish down a little into the full bags, or to get the next bags to form around the bottles from the previous row, without letting the filling get too slack. We tied every few rows together with bailing twine... another bit of stability.


Every few rows we added a nailer at the end to tie the bag wall firmly into the wooden door frame. It was a board screwed into the framing. Chip put screws pointing both up and down into the board that was sandwiched between bags, so that the screws would bite into the scoria filling of both layers. He also attached hardware cloth to the framing (and later to the ceiling) to wrap and plaster into the bags as just another way to connect everything together.


By the time we finished the west wall we had hauled 4-5 tons of lava rock from the front yard to the side, lifted it up to the 7' scaffold, and wrestled it into the bags. Chip did way more of the heavy lifting than I, but we did work together for much of that wall. We weren't sure how successful the spiral was -- you get horizontal flexibility in the design, but vertically the bottles have to go between bags which is limiting. We aren't worried about it; we can use relief in the plaster or even paint to emphasize the spiral if we want to, or we can just enjoy the points of light.


For the east wall, I was pretty much AWOL. I don't exactly remember (it was a year ago, right?), but maybe that was when I was building our new chicken coop, which is another story... anyway, Chip did pretty much all of the (4-5 ton) construction of the east side! He put in an egress window (our only Mount Taylor view from inside) and three shelves.


For the record, we didn't get our house closed up before winter. We still had window and door openings, and here we still were...

Chip built the frame for our big front sliding door while I started measuring out for our rough-in plumbing and got approval for our porch and loft plans.


Then Chip installed our new clerestory windows (with a tiny bit of help from me). We (I) had been timid to put in all 7 windows that Marty had framed for us, because the New Mexico sun can be relentless. But after living through a summer with the windows and finding that the inside of our house was already such a cool respite on hot days, we decided to take the plunge!


Hm. Good progress and all, but I see that I called this "The Closers" when it is obvious there is still a gaping hole in the front of that house...
Well, welcome to our world!


What an amazing transformation. Well done