
Ignorable Details: Lexan
- Kimi BrownKawa

- Feb 26, 2020
- 4 min read
Here is everything you wanted to know (or didn't!) about installing the Lexan on the south face of our geothermal greenhouse. Feel free to ignore this post and go to this more general summary post instead (or read that post first, which links back to this page)!

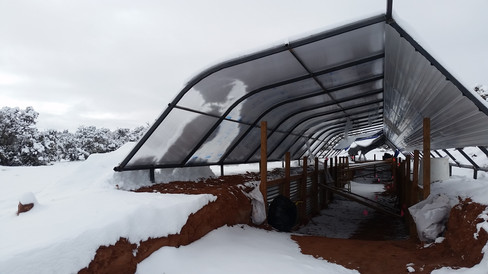
We have had 17 giant sheets of Lexan in the back of our trailer since September -- through several round trips to Gallup and Albuquerque, hauling loads of various building materials that came and went, while that Lexan stood up at the side for months, curving to fit its 14-foot length into our 12-foot space.
Finally, it was time to get that Lexan outa there!
Before using a panel, we had to wrap metal tape around the short ends to prevent bugs and dirt from getting up into the vertical channels. We did this as each sheet came out of the trailer, so the sheet could stay in the trailer until we were ready to use it. We set the sheet up on sawhorses, peeled back the edges of the protective film, installed the peel & stick aluminum tape, and used a sharpie to mark the "up" side. Each piece of Lexan is coated on the "up" side with a UV-protective coating, and on the "down" side with an anti-condensation coating. If you get that backwards, you'll end up with foggy greenhouse windows that will disintegrate in a couple of years! Once we got to the later sheets we just left the protective coating in place through installation rather than marking with a sharpie.


The first two sheets had to be ripped lengthwise into 4" strips. These act as the installation channels for the large panels. We also pre-drilled the steel arches. When we installed the siding we drilled through the siding into the frame, which sometimes created elongated holes in the siding. The Lexan is much thicker and we didn't want to take a chance of messing it up during pre-drilling.
As with the siding, and the retaining wall before that, the first section of the Lexan was the hardest because it was a learning task -- we had no idea what we were doing, or what the hard parts would be. Each 6x17 sheet of Lexan is only directly screwed down along its vertical center. Before placing the Lexan, first you screw one of the narrow strips onto each of the two frame arches on either side. Then you lay in the sheet, and secure it by screwing down the center (into the top and bottom horizontal rails, and two purlins at the front). We started at the east end, so the next step was to use a second strip on the east framing piece to sandwich the eastern edge of the Lexan sheet. (You wait with the strip at the west end until you've placed the next sheet of Lexan).


The last picture above is courtesy of Greenhouse in the Snow to show how the Lexan panels are secured at the edges without screwing into the panel itself. This is done so the Lexan can expand and contract with the temperature without cracking.
We were worried about how unwieldy it would be to wrangle that big sheet in place, with one of us at the bottom and one at the top, and how hard it would be to secure it until it could be screwed in. It turned out the most difficult part was carrying the sheet from the trailer to the greenhouse, since it is such a huge sail -- any breeze feels like a gale. We did have some robustly windy hours, when we simply sat out (or attended to other tasks). Once leaning on the framing, the sheet was easy to manage, and easy to hold in place while screwing.


The hardest part about affixing the panels was trying to aim for the pre-drilled hole in the frame through the multiple layers of Lexan -- it was like spear fishing, in that the clear surfaces distorted the view. Depending upon the angle, sometimes we had to aim almost an inch above a hole to hit it properly. (I have always had an issue with depth perception, and currently have a scummy cataract, so maybe it wasn't as hard as I think!)
The greenhouse directions say to leave the front frame members loose on the lower horizontal rail and to use the Lexan pieces to square everything sheet by sheet. We found that they were landing exactly on 6-foot centers, so we quickly scrapped that method. Instead, we went ahead and secured the entire frame and inserted all of the purlins (when the wind precluded Lexan wrangling). For the few days before the Lexan was fully installed, we had a fun jungle gym!


We got *most* of the Lexan installed before the next big snowstorm, and used tarps on the framing and boards on the grow beds to protect the rest.


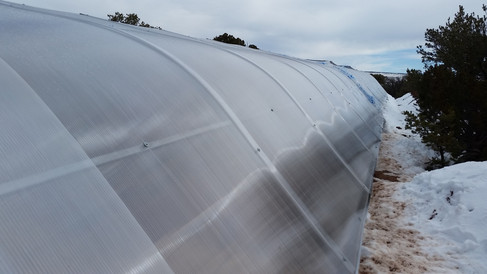
That last photo above is a pretty good simulation of what it looks like to have one eye scummy with cataract schmutz and the other eye clear, which is what I've been enjoying for the last few months! We were actually pretty pleased by the clarity of the Lexan; I was worried it would be more opaque.


When are you getting the cataract fixed??