
Canelo Clay and Lime Workshop
- Kimi BrownKawa

- Jan 12, 2023
- 7 min read
The last week of September we headed to the hills of southeast Arizona for a four-day workshop at the Canelo Project. We had learned of the Steen family and their amazing work from a friend we met at a food sovereignty conference in 2018. We had watched the mesmerizing plaster videos put together by adult sons Benito and Panther Steen of the Nito Project, and were eager to learn from this family of artisans. Besides, it promised to be a respite.

It might sound funny to take a break from building our house to go and provide labor on someone else's land... But at home we are working under the burden of our overwhelming building job, bearing the responsibility of every decision while hyper-aware our own ignorance, and (by the way) having to manage our day-to-day life while living in a pop-up camper and cooking out in the elements with a 5-gallon bucket for a toilet and a faucet for a shower. At Canelo we stayed in their comfortable, well-equipped guest house and they kept us heartily fed while sharing their knowledge and artistry. We were able to explore materials and techniques under their gentle guidance, and to build confidence for that monstrous earthen job back home.
Our Instructors
Our primary instructors for this course were mom Athena and son Oso. The rest of the family members were on site and sometimes worked with us, along with other staff members and interns.


The workshop that we did was called "Artistry with Clay and Lime" which was a fun, engaging way to learn the skills and techniques that we would need when working with those materials. The four-day course interwove direct instruction in the living room with hands-on activities around the site. The key outdoor activities included refinishing the clay exterior of a shed, refinishing the lime exterior of another shed, and working on our own layered student panels. Each task required multiple applications. This work was well organized, and we moved between the various activities to fit the timing of the materials. While one layer was drying we moved to a different site to do the next wet layer there -- very efficient, and each task informed the next. The photos and information below are arranged by topic rather than trying to follow our cyclical process chronologically.
Materials
We learned some of the tricks of preparing batch materials efficiently. We have since purchased a nifty truck bed offloader from Harbor Freight after Oso shared that tidbit with us, turning a crank to roll a load of dirt off of the truck bed into a wheelbarrow or pile. I would love to find some of the heavy-duty screens they used for sifting! They got them as cast-offs from a materials company.
We mixed their versatile clay-straw recipe that allows for thicker coats and sculptural work without worrying about cracking. That ought to come in handy when we are plastering our highly textured shotcrete tire bale walls!


And of course, after every session, there was the immediate cleanup and tool care. Chip and I could stand to incorporate more of those habits into our daily life...
Refinishing the Bucket Shed
I imagine most Canelo plastering workshops spend some time either plastering a new building or replastering an older building. In our case, we started with the bucket shed. The building was still sturdy and lovely, but was showing its age in that the straw was showing through the surface, as you can see in the first picture which only has a few small patches of new plaster.
Athena also had a couple of pet peeves about the building that she used to give us practice in her philosophy of creating features out of problems.


The sweeping curve along the back wall and flatter dip accent on the corner by the door are two of the areas Athena redesigned through this activity.
Fresco Project
We also worked on a little shed that, if I remember correctly, was built some time ago and lime plastered with the base scratch coat and then never finished. One wise word of advice that we heard a few times over the four days is to make your scratch coats aesthetically pleasing in case you don't get around to the next coat for a few years!
Our job was to put on a leveling coat followed by a finish coat of lime plaster. Then, when the plaster was leather-dry, we applied a fresco painting. Unlike painting a finished wall, fresco is painted on the surface of lime plaster while it is still wet. The pigments are permanently locked in through lime's chemical process of curing, and the colors stay fresh and bright years later, even under the relentless sun.


We are unlikely to do a decorative painting on our house, but it was a neat technique to learn.
At Canelo some of the built-in earthen furniture is finished using the fresco technique to apply a long-lasting permanent solid color over the whole thing, which makes so much sense. You need to have a mineral-based pigment that you can grind to a fine powder. We do have some small veins of beautifully colored clays and sandstone in our mesa -- not enough to harvest for earth plaster, but plenty for mixing fresco pigments. We might be able to use that to color the front face of our house, which will be finished in a lime plaster.
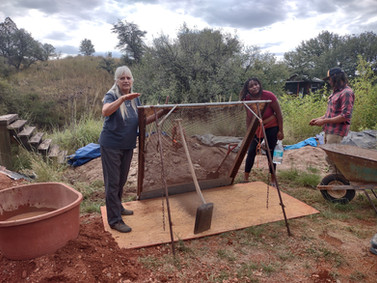
Student Panels
Canelo has a great covered area with individual student panels for their main instruction space. These provided a place for each of us to explore at will without worrying about messing up one of their permanent buildings.
We first learned how to use the hawks and trowels to cover the entire board with a base dark brown coat. Yes, even around the corner... a cruel exercise for rank beginners to try to plaster a smooth layer around the corner! They were building our "It'll be OK; I can push on through" muscle!
When that was dry, we used Athena's magical straw base to cover about half of our space for thicker sculptural work.
Then we built up layers on the dark brown side: dark black and then creamy white.
We continued working and smoothing our sculptural side, and started carving the layered side as the layers dried appropriately.
Finally, after we had looked at various paints, wheatpaste, and finishing options, we were able to add other colors as desired.


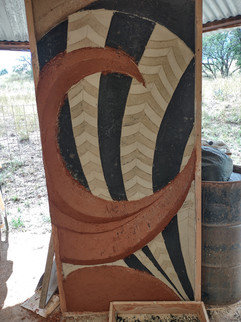
Below I show the progression of four of the panels.
The top row of photos are of Athena and Oso's demonstration panel. Lupita (a family friend who comes to stay during workshops to cook the most delicious Sonoran meals) also joined Oso for some of the carving. They carved just through the surface of the white layer, creating a monochromatic design with texture.
The second row is Rachel's design. She did minimal carving, but her positive/negative sprites holding hands around the corner made great use of that space.
Of course I included ours... the third row is Chip's. I love his carved whimsical nodding weedy-heads.
We didn't really share our thought processes. I used my panel (last row) to try out textures and to see if I could emulate brush work with clay. Maybe someone else could, but the stiffness during carving was quite a constraint and changed my direction. I do like the many different looks of the materials, but woudn't usually want to see them all in one area. So I felt less successful in creating what was in my mind, but super successful in building my comfort level with the medium.


I will say that at first I did not like the base straw mix -- it seemed unmanageably wet and coarse -- loosey-goosey. But we learned techniques over the days on the various projects, and as the straw mix dried and we returned repeatedly to continue, everyone's panels became more refined. We were able to polish and work the leather-hard clay with our trowels, and later we could add a smoother layer of clay on top to shape and smooth it further.
The student work is pulled down to the original lathe after each session, to make way for the next workshop. Ephemeral art!
Earthen Floor
At the eleventh hour before we headed to Canelo, we saw that they were offering an upcoming plaster workshop that would focus on plastering walls and building earthen floors. Since the Artistry class had a waitlist, Chip called to see if we should give up our slots and switch to the other class. Bill said we should just come to the Artistry class, and he'd give us a quicky overview of building an earthen floor. We took him up on that generous offer! Between the other activities, he fit in two sessions to put down the gravel and base coat in the first session, and the finer finish coat in the second session.


Above are photos of two of the earthen floors we saw on site. The monolithic earthen floor with clay paint details is from son Benito's kitchen floor. The painted area sets off the seating area nicely. The other picture shows earthen floor installed between redwood dividers, which lets you work with a small section at a time and is less prone to cracking.
Canelo Buildings
Finally, here are just a few photos of natural buildings at Canelo. There's an unfinished building waiting for a future plaster workshop, a play house, various utility buildings, done with straw bale, stone, glass bottle walls, timber framing... the last three are from Benito's house He is a polished plaster master!
There are many more photos of their beautiful projects on the Canelo website.


It was a wonderful five days. We are so impressed with the way the Steens live their values and surround themselves with beauty of their own making. They are amazing artisans: Athena's deep-rooted clay work, Bill's photography and cooking, Benito's polished plasters, Oso's finish carpentry, Panther's videography. They also each have well-rounded overlapping capabilities and they are incredibly hard workers. But above all I was impressed by their generosity of spirit. They opened their home to this group of strangers -- we learned, ate, chatted, and relaxed in the Steen's main home, and toured the adult kids' homes as well. And of course they are infinitely generous sharing their deep knowledge and experience.
Back home, unfortunately, we returned about a week before the start of our consistently freezing weather. We did get a scratch coat on our exterior bag walls before wintery weather set in. But for now we have had to turn to other tasks...
Impatiently Waiting for Plaster Season 2023!!


Kimi - It looks like you learned so much and the process is so beautiful with room to add artistry and personalize every inch of a wall (or floor). I hope the chickens were happy without you and that the winter is not too cold. Love you! Anna
Amazing experience you had with the Steens. Appreciate you sharing